Windows 7 Desktop Gadgets
I’ve been playing with Windows 7 Desktop Gadget technology and I must tell you – I just love it! And I’ll tell you why :)
History
The approach of putting web-application right on a desktop was invented by Microsoft in 1994-95 (in Windows Nashville which was intended to be released in 1996) and was a part of Windows Desktop Update for Windows 95 and a core of Windows 98 Active Desktop. You could set an HTML page (plus JS, of course) as your desktop background and it would be run in IE. Microsoft even had a gallery of Active Desktop widgets. So web-widgets-like functionality was around almost twelve years ago. As with many other Microsoft inventions, it was way too ahead of time.
Another technology that played a role in inventing desktop gadgets is HTA – short HTML applications that run in a standalone way. You had to put your scripts (VBScript or JScript) and styles in a single HTML file, add a special description and rename the file extension to .hta. Here’s a sample code:
<html>
    <head>
        <title>HTA Test</title>
        <HTA:APPLICATION ID="objTest" APPLICATIONNAME="HTA Test" SCROLL="yes" SINGLEINSTANCE="yes">
        <SCRIPT type="text/javascript">
            //some javascript code
        </SCRIPT>
    </head>
    <body>
        <!-- some html -->
    </body>
</html>
You could access all ActiveX objects that your system provided – Scripting FileSystemObject, UserAccounts, WMI etc. – basically everything that was supported in WSH and Script Runtime. If you were using classic ASP on the server, you could switch to writing HTAs with zero effort – language and all the objects would be the same. While any web-development IDEs could be used, there even was a special IDE for building HTAs – HTAEDIT.
So Microsoft had two nice technologies that weren’t actively used – Active Desktop as a way to integrate web-application with desktop and HTA as a core for writing standalone client-side web applications. Both technologies combined both to create Microsoft Desktop Gadgets - small standalone client-side web applications that run as dockable widgets on your desktop – pure HTML,CSS and JS packed with manifest file in an archive.
Usage
If you double-click on this archive, gadget will get installed and can be moved to any place of your desktop. IE8 core is used to run them, so you get full support for CSS2.1, great level of javascript and other IE8 goodness.
The gadgets concept was introduced In Windows Vista – but gadgets had to be positioned inside a special sidebar area – which is not very flexible. In Windows 7 you can put your gadgets wherever you want them to be.
Here’s a screenshot how gadgets look like on my desktop:
Gadgets are especially useful when you have a widescreen monitor or two monitors configuration so that you’ve got much horizontal space, but even if you’ve got a normal monitor as gadgets can be freely positioned, you will find them useful.
I use Twitter, weather (standard), network traffic and cpu meter gadgets.
Awesome technology! I’m planning to build couple of my own gadgets and will definitely prepare a blog post on this :)
Update: It looks like Windows Mobile 6.5 will have support for similar gadgets functionality!
Exploring Windows Desktop Gadgets
First of all, let’s get our hands dirty and create a simple gadget.
Creating a simple gadget
One of the things that was always bothering me was checking comments to my blog entries. There’re usually two ways to check for new comments on your blog – either by subscribing to comments RSS feed or by going to admin web-interface of the blog and checking for comments there. I don’t like first option because I’m subscribed to more than a hundred feeds in my Outlook so I only read them at the weekends when I’ve got enough free time. And I don’t particularly fancy logging to my blog every three-four hours to check for new comments. So Windows 7 Desktop Gadget with my blog comments feed would perfectly suit my needs.
Although this might not sound as a killer app to you, but it does its job and also perfectly shows how simple it is to build a gadget.
First of all, as I’ve already said, Windows 7 Gadget is nothing more than just a HTML page with Javascript and CSS. So I use the same approach as if I had to parse my blog comments on a website – a simple HTML, a bit of CSS and a bit of AJAX. So gadget building comes down to building a client-side web-app and packing it.
Creating a web-app
I created a simple page with a pretty straight-forward javascript. If you take a look at window.onload js code, you’ll see the following:
window.setInterval( function(){ getRSS(url); }, 5*60*1000);
meaning that every five minutes getRSS function is called.
This is the “main loop” of our program. As our gadget is a desktop program written in javascript and since Javascript blocks UI when being executed, setInterval/setTimeout is the only one way to set the “main loop”.
That’s how the javascript in this web-app works:
getRSS function creates XMLHTTPRequest object and sends HTTP GET request to a href="http://sharovatov.wordpress.com/comments/feed/">http://sharovatov.wordpress.com/comments/feed/.
wordpress responds with XML file containing last ten comments from my blog
parseRSS function parses the XML and passes the resulting object to displayRSS which just dumps it to document.body
It takes 15-20 minutes to write such a tiny piece of code. So now we’ve got a small web-application which is a very basic version of RSS reader.
As you may notice, the script doesn’t work on sharovatov.ru. Cross-domain security restrictions is a reason for that – the script is located on one domain (sharovatov.ru) and it tries to request data from another domain (sharovatov.wordpress.com). However, if you save main.html page and rss.js file to your machine, run main.html from IE8 and confirm JS execution, you will see the comments feed displayed.
As we’re done with functionality, it’s time to convert our small client-side web-app to a gadget.
Converting to a gadget
All we need to do now is to add a special manifest file. It’s just an XML file with your gadget description. Here’s mine.
That’s all. Now we pack these three files into a zip archive and rename its extension to .gadget. Here’s a link to what I came up with. Save it as test.gadget and double-click on it. If you then confirm gadget installation prompt, it will appear on the screen and the feed is downloaded and displayed.
That’s the basics of creating a gadget, if you feel interested, read MSDN or follow my posts – I will keep on writing about gadgets and in the next post I’ll show what my comments reader gadget will look like eventually :)
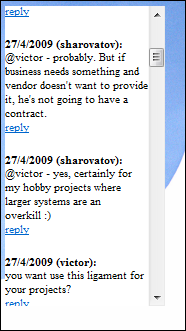
This is the screenshot of a 20-minutes job:
Every five minutes the gadget is updated so I can clearly see whose comment is the last one and reply if needed. Very handy :)
Exploring Windows Desktop Gadgets #2 - security and limitations
First of all, let me repeat that gadget is a client-side web-application running in chromeless mode on your desktop. It’s similar to HTA but provides a whole new set of functionality and also has some restrictions compared to HTA.
Gadgets security model
IE has always been the de-facto-standard platform for building powerful applications that require access to file system, Cryptographic Service Provider, WMI and other OS functionality. This functionality is achieved by using ActiveX controls.
But ActiveX can’t run without a user permission! So by default javascript in a web-applications has quite strong security limitations. This security model can only be weaken by users choice - by allowing ActiveX controls to run or by adding a website to a trusted zone.
But as gadgets are installed by user, so it’s his choice to run them, all functionality that MSHTML can provide is enabled (*). MSDN says:
The MSHTML runtime is configured with the set of permissions given to HTAs or the Local Machine Zone security configuration.
This rises a very important point – don’t install gadgets from non trusted sources. Or if you do, please inspect the code before you install the gadget. As Gadget runs under current user account, it won’t be able to delete system32 directory or do any other critical damage to the system. But it will surely succeed in deleting your documents or photos.
And of course, as any other Microsoft technology, Gadgets can be fully controlled by Group Policy.
For more information on Gadgets security please read this and this MSDN article.
Gadgets limitations
The main limitation to me is that **there’re no modal dialogs. **No alerts, no window.confirm, nothing. So if you want to do a quick debug, you have to dump data to the document itself or use a script debugger.
Exploring Windows Desktop Gadgets #3 - settings storage
This is the third post in Exploring Windows Desktop Gadgets series and it will be devoted to improving our comments feed reader gadget by adding settings storage functionality.
Settings storage theory
Any desktop program has its own settings storage (ini files, xml files, etc.) or uses a global OS storage (registry).
But in web-applications everything’s different – part of the functionality is provided by client (browser) and another part - by the server. Although it’s dead easy to store data on the server, on the client-side you can’t get access neither to file system nor to registry. (You actually can in IE, but this will require ActiveX scripting and therefore will ask user for an explicit permission.)
Until very recent DOM Storage specification draft, in most browsers you could only use cookies for storing some data on client side. However, IE5 introduced support for true client-side only storage – DOM Storage predecessor - userData. So it took almost eight years for the whole browsers industry to define and support similar client-side storage approach. And right at the time as DOM Storage is being drafted by W3C, it gets support in IE8.
The reason I’m telling you about DOM Storage in IE8 is that I have a strong feeling that this DOM Storage is used by Gadgets Platform to allow storing settings data for each gadget.
Settings storage practice
Settings dialog is a modal window which opens on top of your gadget. As it’s modal, the only way you can close it is to press OK or CANCEL button in its UI. Similarly to the gadget itself, settings dialog is a HTML page displayed by MSHTML.
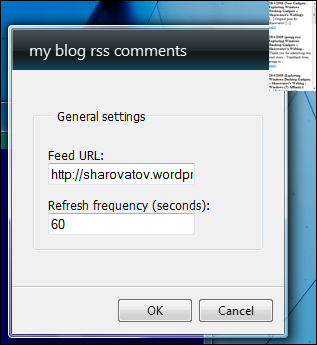
As it would be useful to have comments feed URL and refresh frequency configurable, this is what I’ll add to my gadget:
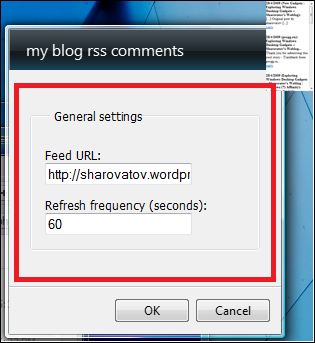
In the settings dialog only area outlined in red is actually a HTML file, title and OK/CANCEL buttons are provided by Gadgets Platform:
To add the settings dialog to our gadget we’ll have to create a HTML file, let’s call it “settings.html”. To save comments feed URL and refresh frequency, we only need two fields and couple of labels.
If you look at the JS code, you’ll see that it does two things:
calls System.Gadget.Settings.read function to retrieve data from the Gadget settings storage
defines a handler for System.Gadget.onSettingsClosing event
There’s a complete reference of Gadget platform events and properties on MSDN, but for our simple case it’s enough to say that System.Gadget.Settings.read reads object from the storage by its name, System.Gadget.Settings.write writes object to the storage with its name and System.Gadget.onSettingsClosing event fires when the settings dialog is closing. Settings store is separate for each gadget so don’t be afraid that your settings names can be accessed from other gadgets.
So in the window.onload handler of settings.html I try to get the data from the storage and set inputs values accordingly, and when the gadget is closing, I check if OK was pressed (e.closeAction == e.Action.commit) and if so, save inputs values into the storage. Dead easy.
Now we have to attach settings.html page to our gadget. This is done by adding the following javascript code to main.html file:
System.Gadget.settingsUI = "settings.html";
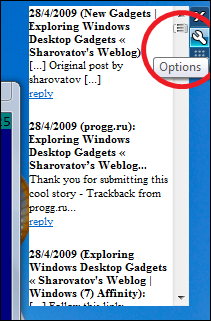
Now our Gadget will show this button in the control area:
And if you click on it, you’ll see your settings.html page rendered in a nice UI:
So now we have a settings dialog that reads and writes data from the Gadget settings store.
What we also need to do is to make our main.html read comments feed URL and refresh frequency from settings store as well. If you look at this javascript, you’ll see how it’s changed from the previous version. Basically, I just did the following:
rss.js now doens’t have blog comments feed URL and refresh frequency hardcoded, instead, it reads these values from settings store:
 window.onload = function(){
     //read data from storage
     var data = getDataFromStorage();

     if ("" != data.url &&
     "" != data.frequency &&
     /^(\d*)(\.?)(\d*)$/.match(data.frequency)) startLoop(data);
     else document.body.innerHTML = "<b>Please make sure you"+
     "configured everything properly</b>";

 };
**System.Gadget.onSettingsClosed **event handler is used to restart main loop with new settings:
 System.Gadget.onSettingsClosed = function(){
     var data = getDataFromStorage();
     startLoop(data);
 };
And startLoop function has been rewritten to allow only one main loop (but that's pretty irrelevant to Gadgets platform):
 var startLoop = function(data){
     //clear existing interval (if present)
     if ("undefined" != typeof arguments.callee.intervalHandler)
         window.clearInterval(arguments.callee.intervalHandler);
     //retrieve feed again
     getRSS(data.url);
     //set new main loop
     arguments.callee.intervalHandler = window.setInterval(
         function(){ getRSS(data.url); }, data.frequency * 1000
     );
 };
And here we go – gadget’s ready :)
Save it as rss-comments.gadget to your computer and install it – you will be able to set comments feed URL (so you can start using it to watch comments on your own blog) and refresh frequency in seconds.
In the next posts of this series I will cover flyouts, make the gadget look really slick with UI enhancements Gadget platform provides, show how debugging gadgets can be really effective and dive into more details of the Gadgets platform. Stay tuned for more interesting stuff!
Best Windows 7 gadgets
Found the best blog with windows 7 gadgets – http://blog.orbmu2k.de/
I installed Memory usage gadget, updated version of CPU Usage, Network traffic, Volume control and Top 5 processes gadgets. Really great!
I also downloaded all Windows 7 themes from http://windows.microsoft.com/en-US/Windows7/Personalize page – they are just awesome :)
Now the right side of my 2nd monitor looks like that:
Pomodoro Windows 7 gadget
I was really inspired by http://tomatoi.st/ web service which provides an easy to use web interface for Pomodoro time management technique.
But unfortunately, tomatoi.st is down due to overload too often, so I spent 20 minutes and prepared a simple Windows 7 pomodoro gadget. It does just what’s needed – showing timers:
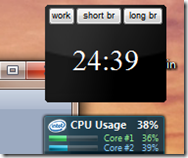
Click on “Work” button to start 25 minutes work interval, “short br” – to get 5 minutes short break timeout, “long br” for a 15 minutes long break.
It’s dead easy to download and install – just click here.
Or you can inspect the code if you want to – gadget is just a zip file with html, css and js inside.
Ah, and I have to warn you – when a period of time is over, it starts playing Alert.wav every second until you set a new period.
For more information about Windows 7 gadgets you read the following posts on my blog:
Or read MSDN.
P.S. this gadget doesn’t have any settings or flyout or anything else – it’s very simple.
Gadgets Flyouts
As it’s practical to have small gadgets which don’t take much of screen space, it’s not possible to display much information on them. That’s why Gadget Platform provides a way to add a flyout object to your gadget.
Flyout theory
In theory, flyout is supposed to present additional or detailed information about anything you choose.
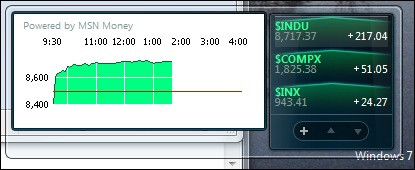
The great example of flyout use case is standard Windows 7 Stocks gadget – it shows basic stocks rates information in the main window and the if you click on the stock rate you’re interested, MSN Money chart for this stock rate is shown in a flyout. Here’s how it looks:
Flyout is a separate HTML page which you attach to your gadget similarly to settings window – by specifying the following:
System.Gadget.Flyout.file = 'flyout.html';
Another difference from settings dialog is that settings dialog is only accessible by clicking on a options button:
 and flyout is shown/hidden programmatically by setting its show property to true/false:
//show flyout
System.Gadget.Flyout.show = true;
When you set show to true, flyout html will be rendered and its window will be automatically positioned depending on the content size and gadget’s position.
Flyout provides two events - System.Gadget.Flyout.onShow which is fired when the flyout is shown and System.Gadget.Flyout.onHide which is fired when the flyout is closed.
To set flyout content to something meaningful, you have to get access to flyout’s document from your gadget main window javascript. This is achieved by using System.Gadget.Flyout.document property – but the call to it will throw an exception if flyout is hidden, so make sure you either check System.Gadget.Flyout.show property for true or wrap the code which uses System.Gadget.Flyout.document in try-catch block.
Note that you can also access main gadget page from the flyout by using System.Gadget.document property which is always available.
Enough theory, let’s modify our Gadget to show only comments titles on the main page and render a flyout with comment’s content when title is clicked.
Practice
So here’s what I did:
created flyout.html file
referenced it as
System.Gadget.Flyout.file = 'flyout.html';in rss.jsmodified displayRSS function to store current comment object in paragraph’s expando property
added toggleFlyout function to the rss.js file which passes the comment object from the **
<p>**’s expando property toSystem.Gadget.Flyout.documentand displays the flyout
The resulting files and the compressed gadget are here.
In the next posts I’ll show what styling options we’ve got in Gadgets Platform, will proceed talking about gadgets security and talk about advanced javascript techniques that can be used in gadgets.
Pomodoro Windows 7 gadget
I was really inspired by http://tomatoi.st/ web service which provides an easy to use web interface for Pomodoro time management technique.
But unfortunately, tomatoi.st is down due to overload too often, so I spent 20 minutes and prepared a simple Windows 7 pomodoro gadget. It does just what’s needed – showing timers:

Click on “Work” button to start 25 minutes work interval, “short br” – to get 5 minutes short break timeout, “long br” for a 15 minutes long break.
It’s dead easy to download and install – just click here.
Or you can inspect the code if you want to – gadget is just a zip file with html, css and js inside.
Ah, and I have to warn you – when a period of time is over, it starts playing Alert.wav every second until you set a new period.
For more information about Windows 7 gadgets you read the following posts on my blog:
Or read MSDN.
P.S. this gadget doesn’t have any settings or flyout or anything else – it’s very simple.
![gadgets-screenshot[1] gadgets-screenshot[1]](http://sharovatov.files.wordpress.com/2009/05/gadgetsscreenshot1_thumb.png?w=354&h=775)
![gadgets-screenshot2[1] gadgets-screenshot2[1]](http://sharovatov.files.wordpress.com/2009/05/gadgetsscreenshot21_thumb.jpg?w=444&h=1025)
